The starting screen for sending e-invoices looks like this

The first step before starting work is to fill in the master data for your company.

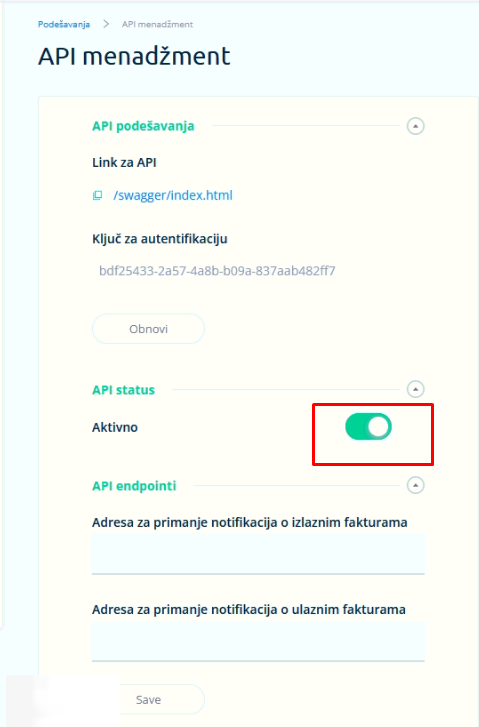
It is necessary to enter all your data as shown in the picture. In the key field, enter the API key that can be obtained when you log in to the e-Invoice website in the API management section. In addition to the key on the e-Invoice website, it is necessary to include the ACTIVE button.


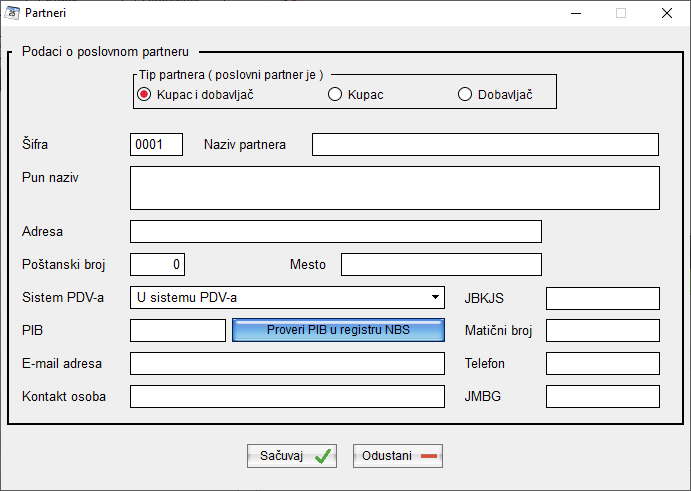
The next step is to enter your business partner to whom you send the e-Invoice. From the menu, select the partners button, then the NEW button, and a window like the one in the picture below will appear.

It is not necessary to enter all the data about the partner, it is enough to enter his PIB (PIB - Tax identification number) and by clicking on the button Check PIB in the NBS (NBS - National Bank of Serbia) register, we will get all the necessary data available to the NBS related to that business partner.
Note: data on users of public funds (budget institutions) are not available, so you must enter them by filling in all the necessary fields. When entering data for budgetary institutions, it is necessary to fill in the JBKJS field, i.e. the unique number of users of public funds (5 digits).
The next step in creating an electronic invoice is to enter your items, we do this by clicking the Items button in the main window. We will get a window like in the picture

Clicking on the New button opens the possibility to enter details about the items. The program itself offers the next item code, and if it doesn't suit you, you can enter your codes yourself. It is necessary to enter the name of the item, the unit of measure and the tax rate (in rates of 20, 10 or 0 - if you are not in VAT).
Now we can move on to creating invoices or proforma invoices, the procedure is the same with the fact that invoices can be sent electronically as an e-Invoice. In the main window, by clicking on the Bill button, we get a window like the picture below

The number of bills increases by one for each subsequent bill, then it is necessary to click on the F3 button to select the business partner to whom we are sending the invoice. If that partner does not exist, we can add it by clicking the button with the plus sign. Then you need to enter the invoice date, transaction date and maturity date. Other items should not be changed (tax category, tax category code...). If there is a tax exemption, then it is necessary to select the type of tax exemption from the list that we get by clicking on the magnifying glass button. Then we click on the button Create bill.

The fields for entering items for our invoice will be freed up. It is necessary to enter the code of the item, or if we do not know it, by clicking on the button next to the code marked F3, the codebook of the items will be displayed, and by selecting one of the items, it will be displayed on the screen. The next thing we need to enter is the quantity we are selling, its retail price (price including VAT) and the percentage rebate if any. All other fields will be updated automatically. By clicking the Save button, that item will be found in the table below and we can enter the next item if we have it on that invoice. If we made a mistake by selecting that item in the table below and clicking the Delete button, that item will be deleted from our invoice and we can add a new one. When the invoice is done, we move on to the next step.

In the left table will be the header of our invoice and above the table will be written our business partner to whom we are sending that invoice. All invoice items will be displayed in the right table. We can print this invoice by clicking the Print button. We can delete it by clicking the Delete button (this deletes the entire invoice with all associated items). And we can send it as an e-Invoice by clicking the Send e-Invoice button. The following window will appear

In Attachment 2 and Attachment 3, you can add, if necessary, some supporting documents whose size does not exceed 25MB in total. All you need to do next is to click the Submit via API button and wait for the process to complete.